本專欄主要以網路投幣計時器的主題,期望透過投幣的機制,來取得電力插座使用時間,進而控制家庭電器的使用時間,並可以透過網際網路來查詢使用情形。
本篇是接續上篇文章『如何設計網路計時器:電路組立上、下篇』(曹永忠, 2016b),主要是介紹讀者,接續將投幣計時器、網路投幣計時器,相關元件,進行硬體組立(曹永忠, 2016a, 2016b; 曹永忠, 許智誠, & 蔡英德, 2015a, 2015b, 2015e, 2015f, 2015g, 2015h, 2015i, 2015j)。
關於組裝元件
關於所需的元件,請參閱上篇文章『如何設計網路計時器:硬體組立篇』(曹永忠, 2016b; 曹永忠, 許智誠, et al., 2015a, 2015b),
網址如下:http://www.techbang.com/posts/44123-how-to-design-a-network-timer-hardware-group-legislative-review,本文不再重述。
計算使用時間
Arduino 投幣計時器最重要的事:我們根據投幣數目,換取可使用電力的時間,所以本文主要是將投幣數轉換成可使用分鐘數。
我們依照上面所述,將硬體與電子電路組立好,攥寫下表程式,編譯之後,上傳到 Arduino 開發版測試。
投幣計數器測試程式三(Coin_test03)
#include <DS1307RTC.h>
#include <Time.h>
#include <Wire.h>
#include <LiquidCrystal_I2C.h>
#define CoinMinute 3 ;
LiquidCrystal_I2C lcd(0x27, 20, 4); // set the LCD address to 0x27 for a 16 chars and 2 line display
int coinnum = 0 ;
tmElements_t tm;
int TotalCoin = 0 ;
int CoinTime = 0 ;
void setup()
{
lcd.init(); // initialize the lcd
// Print a message to the LCD.
lcd.backlight();
//pinMode(3,INPUT);
attachInterrupt(1, addcoin, RISING);
//attachInterrupt(1, addcoin, CHANGE);
// attachInterrupt(RFIDIntrupNumber, ReadRfidID, CHANGE);
}
void loop()
{
// 將游標設到 第一行, 第二列
// (注意: 第二列第五行,因為是從 0 開始數起):
lcd.setCursor(5, 1);
// 列印 Arduino 重開之後經過的秒數
lcd.print(millis() / 1000);
getDateTime() ;
LCDDateTime() ;
LCDCoin(TotalCoin,CoinTime) ;
delay(200);
}
void addcoin()
{
TotalCoin ++ ;
CoinTime = CoinTime + CoinMinute
}
String print2digits(int number) {
String ttt ;
if (number >= 0 && number < 10)
{
ttt =String("0")+String(number);
}
else
{
ttt =String(number);
}
return ttt ;
}
String print4digits(int number) {
String ttt ;
ttt =String(number);
return ttt ;
}
String StrDate() {
String ttt ;
ttt = print4digits(tmYearToCalendar(tm.Year))+"/"+print2digits(tm.Month)+"/"+print2digits(tm.Day) ;
return ttt ;
}
String StrTime() {
String ttt ;
ttt = print2digits(tm.Hour)+":"+print2digits(tm.Minute)+":"+print2digits(tm.Second) ;
return ttt ;
}
boolean getDateTime()
{ if (RTC.read(tm))
return true ;
else
return false ;
}
void LCDDateTime()
{
lcd.setCursor(0, 0);
lcd.print(StrDate());
lcd.setCursor(11, 0);
lcd.print(StrTime());
}
void LCDCoin(int c1,int c2)
{
lcd.setCursor(1, 3);
lcd.print("Credit:");
lcd.print(c1);
lcd.print(" / ") ;
lcd.print(c2);
lcd.print(" min");
Serial.println(coinnum);
}
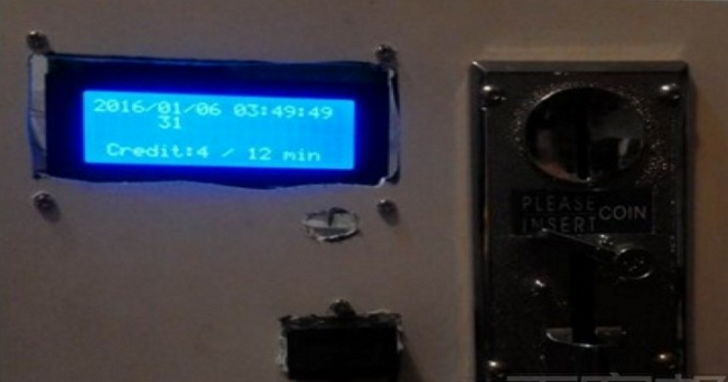
讀者也可以在作者 YouTube 頻道(https://www.youtube.com/user/UltimaBruce )中,在網址https://www.youtube.com/watch?v=z7Iasqh6tIw&feature=youtu.be ,看到本次實驗-我們已經可以在投幣時,將時間累加進去系統,並顯示在 LCD 顯示模組上,我們投幣時,可將時間累加後再 LCD 顯示模組會加上可使用時間。
當然、如下圖所示,我們可以看到投幣計數器測試程式三結果畫面。

▲投幣計數器測試程式三結果畫面
下一頁還有更精采教學哦 ~

請注意!留言要自負法律責任,相關案例層出不窮,請慎重發文!